カスタム認証では他の認証方式とは異なり、Firebase内にユーザの認証情報を持ちません。
そのため、下記の手順で認証を行うことになります。既存サービスのサーバでユーザ認証を行う
↓
サーバから既存のユーザIDでFirebaseにアクセストークンを発行してもらう
↓
アクセストークンをクライアントに返す
↓
クライアントがアクセストークンでFirebaseにログイン
↓
既存のユーザIDでFirebaseにアクセス可能
全体の流れはこんな感じ。
- 外部の認証でUIDを取得する
- サーバ側: firebase-adminのcreateCustomToken()でカスタムトークンを作成する
- クライアント側: firebaseのsignInWithCustomToken()で認証する
カスタムトークンの作成にfirebase-adminが必要なので、サーバが必須なのが注意。
サーバじゃなくてCloud Functions上でもOK
秘密鍵の作成
https://console.cloud.google.com/apis/credentials?authuser=3&pli=1&project=testfirebasedbrulekanehi-404fb&folder=&organizationId=
APIキーの有効化
https://console.cloud.google.com/marketplace/product/google-cloud-platform/customer-identity?hl=ja&project=testfirebasedbrulekanehiro&folder=&organizationId=
TestFirebaseDbRuleKanehiro $ composer require firebase/php-jwt
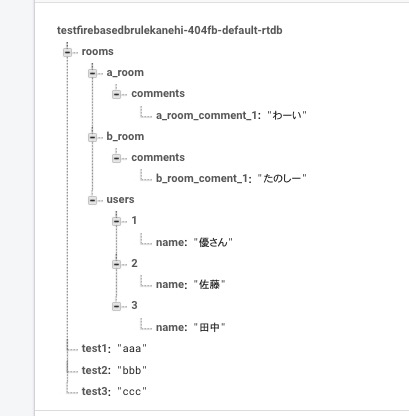
Rule
{"rules": {
    ".read":false,
    ".write":false,
    "users": {
      "$user_id": {
        ".write": "auth.uid === $user_id", //ユーザー情報の変更は自分自身のみ
        ".read": "auth.uid === $user_id"
      },
    },
    "rooms": {
      ".read": "root.child('rooms/users/' + auth.uid).exists()",
      ".write": "root.child('rooms/users/' + auth.uid).exists()",
    },
    "test1":{".read": "auth != null"},
    "test2":{".read": "auth.uid == 'admin'"},
    "test3":{".read": "auth.token.custom_permit_option == 'test'"}
  }
}
まとまってる
関連記事 - More from my site -
 Git 全てのstashを削除する
 WordPressプラグイン 作成_1 Hello Dollyを眺める
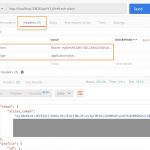 jwt-auth + Laravel6 アクセストークンとリフレッシュトークン
 Apacheログ分析 Fluentd+S3+Athena
 GCP CloudFunction 関数の作成 CloudFunctions+BigQuery+CloudRun+ESPv2+独自ドメイン
 置換積分
置換積分 抽選くじがあたる確率
- クラウドやVPSの初期構築時のデフォルトを後から変更する場合の注意
![国内金融機関での活用事例 メモ[NOINDEX]](https://www.yuulinux.tokyo/contents/wp-content/uploads/2018/11/fintech03-150x150.png) 国内金融機関での活用事例 メモ[NOINDEX]
国内金融機関での活用事例 メモ[NOINDEX] 仕事算
仕事算 AWS SSMでSSHクライアントレス
 3乗の因数分解
 Ping-t CCNA 簡易シミュレータ スウィッチ版ノート
 Firebase Cloud Functions new Date() 日付がずれる Asia/Tokyoに設定